WP Media Folder: Folders and Media
The main idea of WP Media Folder is to classify media directly from the media manager. WP Media Folder works on the native media manager, both from the public and admin side. For example you can use it in posts and pages.
1. Manage folders from posts or pages
In Classic Editor, to use WP Media Folder just click on the Add Media button. With Gutenberg editor, please go to this section 7. Single Image Lightbox block in Gutenberg for more information.
Click on it to open the main media view with the folder management.
There's a button to create a folder and directories are listed below. When you click on Add New Folder button you have to type a name and validate the creation.
If you want to create a sub-folder you just need to enter in a folder and repeat the operation. You can then use the breadcrumb or folder tree so not to lose yourself in folder levels :)
A single media can belong to several folders. When you click on a file look for the Media Folders selection setting in the the right side column and click on it.
You can also use the WordPress media manager to batch apply multiple folders to multiple media. First, click Bulk Select, pick media files and then press the Media folders selection button.
Restrict folders access
Virtual folders in Media library can be restricted by User or Role. This feature is applied to both local folders and cloud folders (Google Drive, Dropbox, OneDrive Personal and Business). Only the admin role can see this feature on the context menu of the folder. In order to set roles, you should enable Media access by User or User Role option at plugin settings > Access & Design > Media Access. Then go to Media library, right-click on a folder and select Permission settings.
Then on the popup window, you can select, add or remove roles/users. These are 2 main tabs and include options below:
- Inherit permissions: Inherit role from the parent folder. Once it's enabled the other options will be removed.
- View folder: Users/Roles can view folders
- Add Folder: Users/Roles can add new folders
- Update folder: Users/Roles can rename folders
- Remove folder: Users/Roles can delete folders
- View media: Users/Roles can view media uploaded by others
- Add media: Users/Roles can add new media
- Move media: Users/Roles can move media from folder to folder
- Remove media: Users/Roles can delete the media
- Update media: Users/Roles can update images' information: title, alternative text, ...
2. Manage media
You can drag'n drop a folder(s) including its sub in Media library. Or you can click on Upload folder button.
In order to move one or several media in a folder, click on the media and drag it into the folder you want.
You also have the possibility to drag multiple images into folders or into the folder tree. First select media.
Then drag media into folders.
A notification will then be displayed in the top right corner with the possibility to UNDO the last media move you've just made.
How to download an image?
First, you need to enable "Download media" option at plugin settings > General > Main Settings tab.
Then on the Media library with Grid view, just right-click on any images, and you will see the Download button.
How to download a folder?
To download a folder along with any included sub-folders, simply right-click on the desired folder and choose Download > ZIP Folder/ZIP Folder & Subfolder.
Folder selection while uploading new files
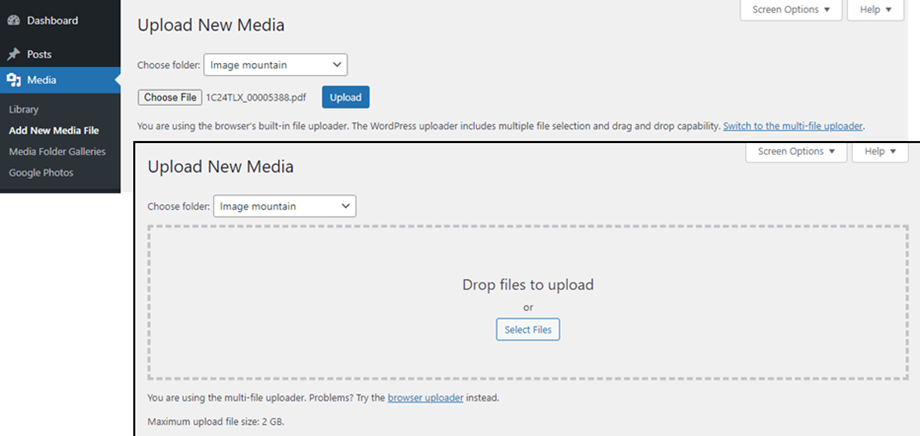
When navigate to Media > Add New Media File, you can now select a folder before uploading new files.
Bulk tagging media
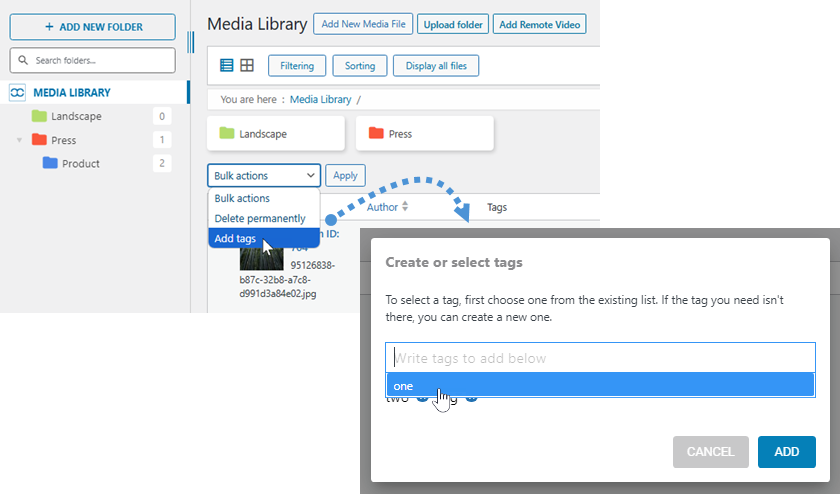
To add tags to multiple images simultaneously, start by switching to the List view layout in Media. Next, bulk-select the files you want to tag. Then, choose the "Add tags" option and click the "Apply" button. A popup will appear, allowing you to enter a new tag or select from existing ones.
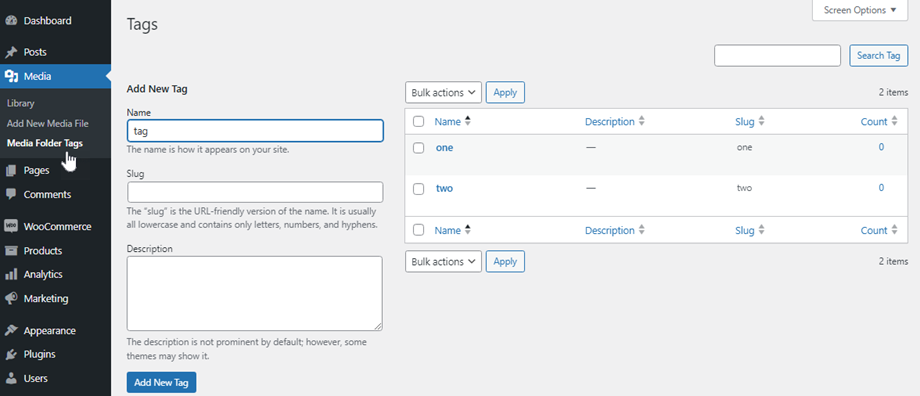
To manage tags, go to Menu Media > Media Folder Tags. From this section, you can add, edit, or remove tags as needed.
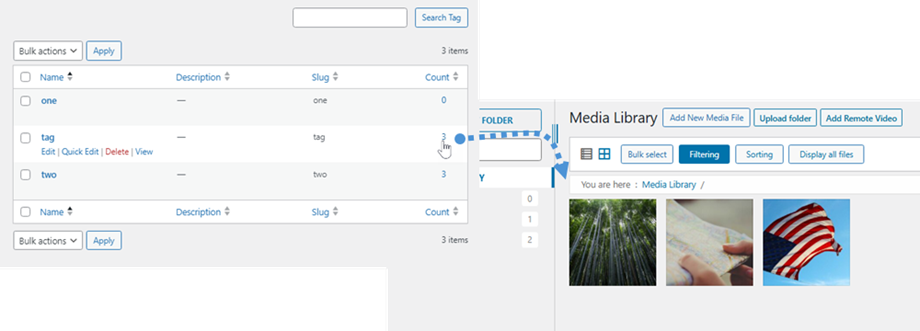
Once a tag has been assigned to any images, you can view all files with the same tag by clicking on the number in the Count column.
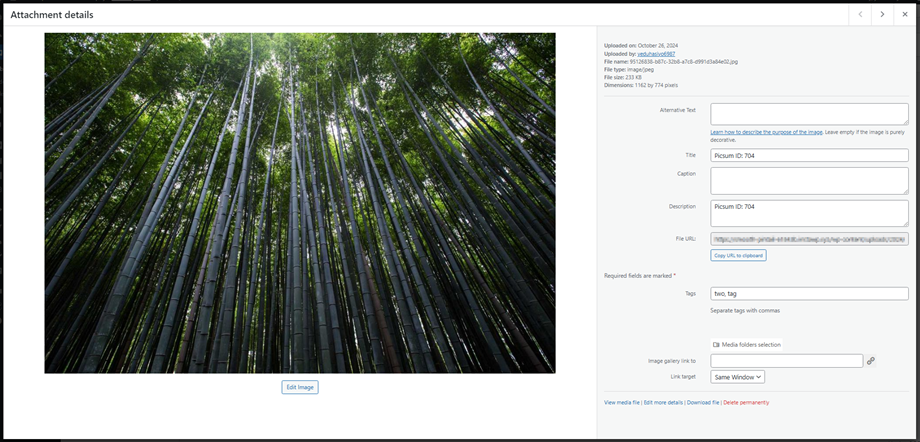
In the Attachment Details popup, you can also add tags for a single image in the Tags field. Please note that the user interface differs slightly between List view and Grid view.
3. Remove and edit folders
The folder can be renamed by double-clicking on the folder on the left panel or right-clicking on the folder and choosing Edit Folder.
To remove a folder, simply right-click on it and select the Delete button.
If you wish to delete multiple folders simultaneously, right-click and choose the Bulk select folders option. Then, check the box in front of each folder you want to remove and click the Delete button located at the top of the folder tree.
If you remove a folder with media inside, by default all media inside will go back the root of the media manager.
You can also change the color of the folder from the Change color menu.
4. Media view
The media and folders can also be managed from the WordPress media manager view. You can adjust the width of the left panel containing your folder tree.
You'll also see existing folders from the media view. Note that article categories are automatically added as folders.
To upload media in particular folders, select one or search folder on the left panel. Then click on Add New button or Drag 'n drop your media. From the folder tree, you can ensure that you're in the right folder.
You can view media in listing mode.
5. WordPress media searching and filtering
WP Media Folder adds some new features to the default media manager. You'll find all the settings in the plugin configuration General > Media Filtering. You can use default ones, remove some filters and add your own.
From the configuration you can setup the weight and size filters ranges.
The sorting dropdown lists can filter and sort images and folders based on:
Filtering
- Clear filters and sorting
- Display only my own medias
- Display all files
- Media type (image, zip, pdf, unattached, mine,...)
- Date
- Minimum size (in pixels)
- Weight range
You can select multiple options to filter in Media library.
Sorting
- Sort folder (ID, Name, Custom order)
- Sort media (Date, Title, Size, File type, Custom order)
Once the option "Search file in a folder and its subfolder" is activated, you can search the file name in not only that folder but also its subfolders.
6. Add remote video
First, if you do not see the Add Remote Video button on Media library, you should enable Enable remote video feature option at General > Main Settings tab.
Then you will see the Add Remote Video button at the header or click on Add New >> Add Remove Video button.
Next, a text box will be displayed on the screen where you can paste the YouTube link. Then you will see a YouTube file among your media.
7. Single Image Lightbox block in Gutenberg
Similar to the Classic Editor, a single image can be inserted into your posts/pages. Please go to WP Media Folder section > WP Media Folder Image Lightbox block, then on the block, click on "Add Image" button to pick an image you want to put on the content.
In order to see the block, make sure the Enable the single image lightbox feature option is enabled at Configuration > Wordpress Gallery > Gallery Features.
8. PDF Embed in Gutenberg
There is an option to embed a PDF file when inserted in Classic Editor. Now you can do in Gutenberg editor also.
First, click on the 'WP Media Folder PDF Embed' button within the WP Media Folder category. Next, press the 'Add PDF' button and choose your desired PDF file, then click the 'Select' button. After these steps, you'll be able to preview the entire PDF directly in the editor.


